I really, really hate feeling under the weather. It stresses me out, man.
I've been trying to cure my achy ears and scratchy throat with peroxide drops, salt water gargles, green tea, and lots of broth. But I really think it's more of an emotional ‘under the weather' than a physical one. I think I've spent too much time stressing over all that is to change one the new wee one arrives and I've been running myself ragged in the process.
It's good, I suppose, to have your body remind you that in the ninth month of pregnancy, it is essential to slow down a bit. I've been experiencing lots of painful pressure ‘down there' and am really starting to feel uncomfortable. I tried to explain the weird sensation to my husband, but it's a difficult one to put into words…
…”It feels like someone kicked me between the legs…but from the inside sort of”…
I'm sure that makes no sense to him. So, he simply resorts to smiling as I waddle on by…
And it is very much a waddle these days because of said pressure.
But so it goes. If baby is happy and healthy in there, so be it.
In this crazed nesting process, I've been attempting to stock the freezer with a few items before baby arrives. In doing so, I wandered across a fantastic soaked english muffin recipe.
You may remember we've made SOURDOUGH english muffins before.
But since my sourdough starter is currently non-existent (ya, ya, it's on the to-do list…) I needed to find another recipe that didn't utilize sourdough. And frankly, I'm glad I went looking for it. Because these english muffins totally hit on the correct texture, shape, and look of an authentic english muffin.
And they're soaked to break down phytates.
And they're made with whole wheat flour.
Booya.
I've been trying to make two batches per week to stock up. Most of them will be made up into breakfast sandwiches (fried bacon or sausage patty, fried egg, little bit of cheese) and frozen for an easy and quick breakfast (just gotta warm it up in the oven for 10-15 minutes while you're getting ready!).
I really wanted to have these prepared for Stuart since I make him a hot breakfast each morning and once baby arrives, that may be hard to accomplish for a few weeks.
Enough babbling. Let's bake.
Soaked English Muffins
You will need:
– 3 cups of whole wheat flour (organic, freshly milled is best)
– 1 3/4 cup of raw milk (I usually cut mine 50% with water to make it stretch further)
– 2 tablespoons of vinegar or acid medium of choice (I prefer vinegar since it doesn't impart any taste but lemon juice is great, too)
– 2 tablespoons rapadura or natural cane sugar
Step One: Combine the flour, milk, vinegar, and rapadura. It will be the consistency of a thick batter. Cover and let sit for 12-24 hours.
Step Two: After the soaking period, add in the following:
– 3 teaspoons yeast
– 2 teaspoons aluminum-free baking powder
– 2 teaspoons sea salt
Mix, recover, and allow the batter to sit for another 2 hours.
Step Three: Generously flour a baking sheet. Generously, people. These muffins can get sticky.
Then, generously flour your hands.
Then, punch down the dough and knead it slightly, adding a teensy bit more flour if you need to keep it from being too gooey.
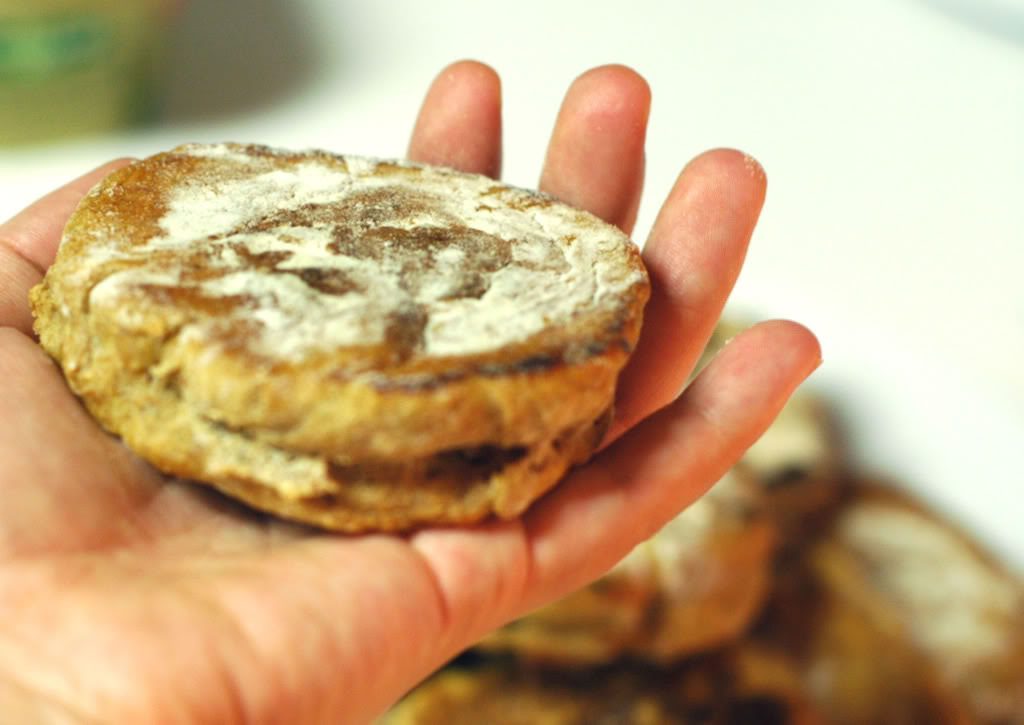
Gently divide the dough into 8-11 ‘muffins'. I find it best to simply work each muffin a bit in my hands with a wee bit of flour to get it to the correct shape. Don't worry about getting it perfectly smooth or perfectly shaped. It's not going to matter in the end.
Here's what they should look like at this point:
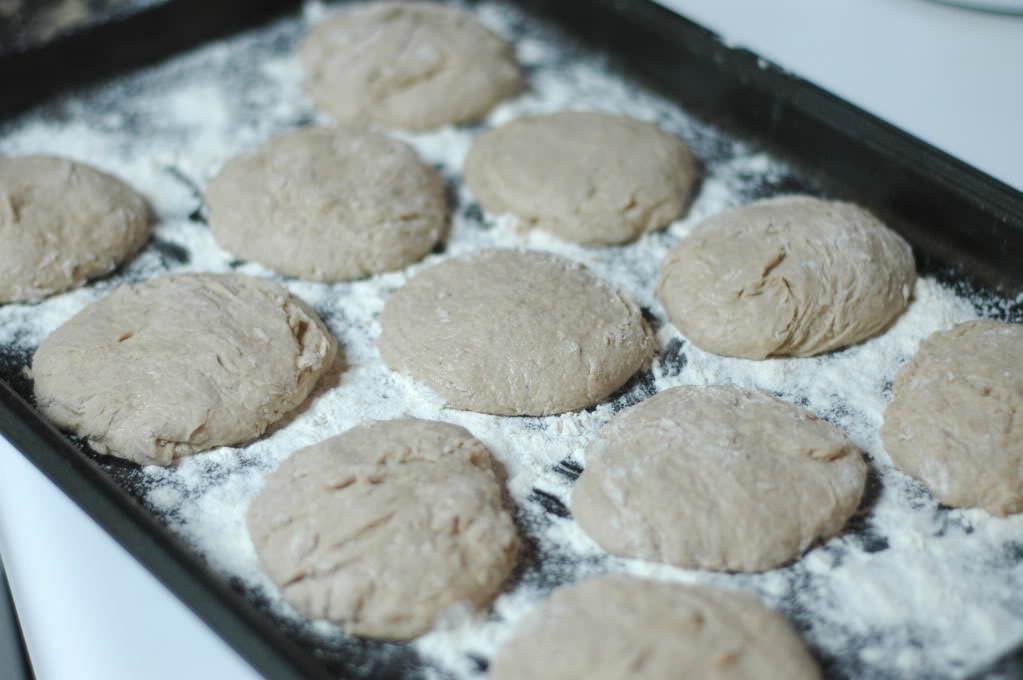
Like sweet little muffins on a floured baking sheet, yes?
Let them sit for 20 minutes and recover from the massage you just gave them.
Step Four: Heat up a cast iron skillet (or skillet of choice) on medium-low heat. Gently transfer a few muffins at a time to the pan. It can be hard to move them, they're sort of gooey. But just be gentle, work with your floured fingertips, and you'll do fine. If it's super funky by the time it gets into the pan, just reshape it a bit with your fingertips. And be careful to not overcrowd them in the pan. They will puff up and expand as they cook.

The goal in this step is NOT to cook the muffins completely, but rather to brown the outsides. So give them about two-three minutes per side and then transfer them back onto the floured baking sheet.
Don't worry about the dough in the middle. We'll bake that out.
Repeat the browning stage with all the muffins. This should take just ten or fifteen minutes.

Step Five: Bake the muffins in a preheated 325 degree oven until they are cooked thoroughly (about another ten to fifteen minutes is all). You'll know when they're ready because your kitchen will begin to smell like heaven.
True story.
At this point in the game, you can either:
– Refrigerate for short-term storage
– Freeze for long-term storage
– Make up into breakfast sandwiches and consume for dinner since you didn't feel like making anything at all and this is good middle-ground for a hungry husband
– Forget dinner and just consume right from the oven with rich Kerrygold butter and homemade fig preserves
Your choice, my friend.
You may also choose whether you break apart the muffin with a knife or a fork.
Knifes give you a clean, smooth cut through the muffin.
Forks give you the ridges that are oh-so-important to an english muffin's texture.
Again, your choice.
I chose fork.
And breakfast sandwiches for dinner.
And eating some straight from the oven, too.
And sitting on my bum, editing pictures, sipping tea, and watching Netflix for the remainder of the night.
And since I failed to take a fabulous photo of a completed homemade english muffin breakfast-for-dinner sandwich, I will instead show you pictures of my little one (who didn't not get her hair done today). And Amen.


Enjoy!
For other great meal ideas, no matter what your dietary restrictions, check out the meal planning service I use: Real Plans.
Soaked English Muffins

Step One:
- 3 cups of whole wheat flour (organic, freshly milled is best)
- 1 3/4 cup of raw milk (I usually cut mine 50% with water to make it stretch further)
- 2 tablespoons of vinegar or acid medium of choice (I prefer vinegar since it doesn't impart any taste but lemon juice is great, too)
- 2 tablespoons rapadura or natural cane sugar
Step Two: After the soaking period, add in the following:
- 3 teaspoons yeast
- 2 teaspoons aluminum-free baking powder
- 2 teaspoons sea salt
Combine the flour, milk, vinegar, and rapadura. It will be the consistency of a thick batter. Cover and let sit for 12-24 hours.
Mix, recover, and allow the batter to sit for another 2 hours.
Generously flour a baking sheet. Then, generously flour your hands.
Then, punch down the dough and knead it slightly, adding a teensy bit more flour if you need to keep it from being too gooey.
Gently divide the dough into 8-11 ‘muffins'. I find it best to simply work each muffin a bit in my hands with a wee bit of flour to get it to the correct shape. Don't worry about getting it perfectly smooth or perfectly shaped. It's not going to matter in the end.
Let them sit for 20 minutes and recover from the massage you just gave them
Heat up a cast iron skillet (or skillet of choice) on medium-low heat. Gently transfer a few muffins at a time to the pan. It can be hard to move them, they're sort of gooey. But just be gentle, work with your floured fingertips, and you'll do fine. If it's super funky by the time it gets into the pan, just reshape it a bit with your fingertips. And be careful to not overcrowd them in the pan. They will puff up and expand as they cook.
The goal in this step is NOT to cook the muffins completely, but rather to brown the outsides. So give them about two-three minutes per side and then transfer them back onto the floured baking sheet.
Don't worry about the dough in the middle. We'll bake that out.
Repeat the browning stage with all the muffins. This should take just ten or fifteen minutes.
Bake the muffins in a preheated 325 degree oven until they are cooked thoroughly (about another ten to fifteen minutes is all). You'll know when they're ready because your kitchen will begin to smell like heaven.


Yes! This is the exact recipe I’ve been waiting for. Can’t wait to make them. 🙂
Alright, girl, I’m ready to rock the Soak. But……I have no milk yet. Today’ is milk pick-up for us, but i’m 3 weeks postpartum and when I want something, by golly it better happen 🙂 I have plain yogurt, could i just use that, watered down, to replace the acid and milk? I just gotta know 🙂
The pressure is a good thing! Bebe is low, so some of your work is done! (This babe was my 5th, and I walked around for almost a month with her do dag-blamed low that the only “lower” she could go was OUT!)
Pr
I would totally do the watered down plain yogurt. Rock it, girl.
Word.
Another Q. your pan looks shiny…are we oiling up for the quick-stop in the tanning bed, er, i mean skillet?
The pan looks shiny on the first batch of muffins because it’s so deliciously seasoned with bacon grease 🙂 By the end of doing all the muffins, it’s floury and dull. So then I just fry some more bacon and get it nice and greasy again 🙂
These look delicious! I am bookmarking these now!
Bacon! All the world’s problems can be fixed with bacon! Has anyone told the candidates this? That’s who I”m voting for: the one who stops putting stuff in mailbox, sets his minions to call me at all hours…and waves the flag of bacon!
I am trying a double batch of these tonight (at least I started the soaking tonight). I used half plain whole milk yogurt half regular milk, with the vinager and sugar…will that be OK? I am new to soaked baking :/
Also, as far as freezing breakfast sandwiches with these; what kind of egg do you throw on these to freeze? Scrambled, over hard? I am curious about how it freezes? I.be frozen. Scrambled eggs before in breakfast burritos, I would LOVE to do breakfast sandwiches with these muffins!
Hope you can get some good rest tonight!
Stephanie, the soaking should go fine! Next time, if you use yogurt, you can omit the vinegar since they both accomplish the same task.
As far as the eggs go, I fry them and break the yolks…so I suppose that would be over hard? I find that they freeze great!
It works with gluten free flour and coconut milk – just tried it!! GREAT recipe. thanks!!
This looks great! I’ll probably try it with coconut milk since raw milk is illegal here. You’re very lucky to have it available to you!
That’s awful am so sorry.
Sometimes cow shares are a viable option
Just made these today as I got your cookbook for Christmas (YES!) and our family LOVES these. Thanks for sharing a soaked recipe for these because we have been eating too many store-bought English muffins lately! Just lovely.
I made it with clabbered (funny, spell check doesn’t know the word) milk and they turned out very light and puffy. Thank you for the delicious post!
Love this recipe! Just made them and ate one! Had to freeze the rest immediately so I wouldn’t eat anymore! SO GOOD!
Oh. My. STARS! These are delicious! I replaced the milk with water and used whey bc I had it. Also left it in the fridge for 72 hrs to further break the carbs down. These.are.so.GOOD!
Hey Shaye! Have been wondering for such a long time where to get good organic yeast?
Please do tell me!
Thank you, thank you!!!! Wonderful recipe..can’t wait to try it.
Oh my goodness! I may never buy another english muffin as long as I live! These were amazing and super easy! Thank you for the recipe! I shared it on my blog today. You rock!!
Glad you like it!
I just made these and so amazing! I was a little doubtful because it is my first soaked recipe, but I am totally converted now. My daughter and husband eat English muffins almost religiously.
These are the best English muffins I have ever made or tasted. (and I have been baking with freshly milled flour for thirty years). As for easy, I have to get used to working with extremely sticky dough,but it was worth it! Thank you for expanding my baking horizons.
Hi, i have made these twice now and they are really delicious! And i have to tell you i love your soaked recipes you have on your blog! 🙂 but was wondering if possible to sub organic honey for the narural cane sugar in this recipe? And if i did would i add the honey to the overnight soak or would i add it in when i mix in the yeast, salt and baking powder?
Yes, you can! I’d add it after the soak.
How do you ever have these fresh for breakfast? What time would you have to get up for that?
I usually make them a day or so ahead… but if you soaked the previous day, it wouldn’t take that long to cook them up for breakfast.
I know this is an older post and I’m not sure if you’ll see this, but I was wondering what your thoughts were to making this with sprouted wheat flour and STILL using the 12-24 hour soaking period? Just a thought.
Couldn’t hurt! I bet it’d still be delicious!
Am truly hoping that you answer.
I have a couple of questions.
The first is we normally only eat either sprouted or sourdough with rare soaked pancakes, pretty similar to Westin Price…..
Your recipes look very carefully put together, do you think yeast other than natural or very rare is ok to use? Is there a way to avoid it?
Next, I have a ton of cultured colostrum buttermilk, has tiny pieces in it, whole milk, is that an acceptable trade off for milk and acid? Have been searching online for a way to use that and gallons of whey.
Am hoping that you have time to answer
Thank you for sharing so much information. I had my last baby almost a decade ago, walked around dilated at 3 to 4 cm for 5 weeks, I don’t think will ever forget that, the prize you get makes it worth it.
Thank you