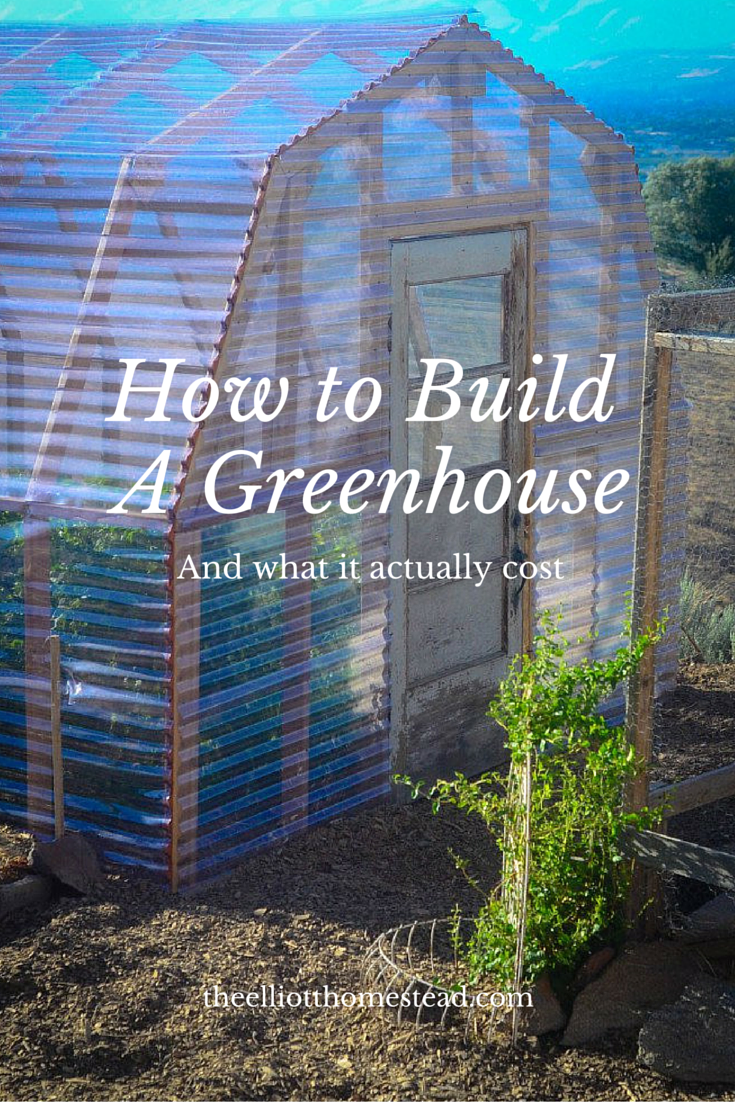
Let's talk greenhouses. Rather, let's talk about how to build a greenhouse.
I've dreamed of them as long as I can remember – lusting after not only the practical aspect of protected and extended growing, but also the beauty. For some reason, I think of old European homes with vined in green houses tucked onto the back corner of the estates, bursting with orchids and exotic plants.
Fine. Mine isn't nearly that exciting. There are no orchids or vines to be had. But that's okay. Because baby, we've got a greenhouse! And that alone is worth serious celebration!

With this greenhouse, we'll be able to not only extend our harvest year round but also begin our starts in a safe and protected place, getting them off to an early start (much unlike the chicken-tomato massacre we had this past year – coupled with the constant dirty mess in the bathroom!).
Because we so strongly desire to grow our own food here on Beatha Fonn, adding a greenhouse – even a small one – was an important step. We live in North Central Washington where winters are coooooold. Unless you're growing in a greenhouse, you're not growing at all. We may even have to double insulate our plantings inside – it's that cold. But still, greens, carrots, radish, broccoli, and a small handful of other cold-loving plants should survive the winter nicely and allow us to harvest fresh produce through the winter.
Did anyone else just jump up and down with enthusiasm? Because I did.
There are a few things we learned while making this greenhouse. And I'm happy to share. There's an on-running joke in our house:
Projects always cost twice as much, look half as good, and take twice as long as you anticipate.
Ain't that the truth. And naturally, the greenhouse was no exception.
It wasn't exactly cheap. And it wasn't exactly easy. But wow – isn't it AWESOME? Originally, we were wanting to build an inexpensive hoop house, made of greenhouse plastic and PVC pipes. Cheap. Easy. Wonderful.
But then we remembered about the zillion mile per hour winds that we constantly get up here on the hill – particularly in the fall and spring. We'd have to design a serious hoop house to withstand these winds. Hmm… the wheels were turning…
We're no architects but eventually we had to conclude (we're, like, so Sherlock Holmes-ish) that a hoop house would simply not do here. We're too exposed to too many harsh elements. On top of the hill we sit. And on top of the hill we shall stand.
Thus began the design of a stick-built greenhouse. The real deal. Sunken into the ground… nailed and screwed… solid and secure. I think in the long run, though it cost much more than anticipated, it'll pay off in the long run. I can't imagine having to fix torn plastic in the middle of a wind storm or replace broken piping. I see the greenhouse as an investment into Beatha Fonn – and really, for this blog. After all, a chef needs fresh ingredients, does she not?
So let's take a look at the process.
How To Build A Greenhouse

1. First, we selected one of the only flat pieces of land that we have on our sloped property. Currently, said flat piece of land was covered in storage potatoes that were thriving. Lush and beautiful, I fear they took the brunt of having a greenhouse built around them rather poorly. It was a sacrifice. Sorry potatoes. Without heavy equipment available to us to flatten a piece of land, we really didn't have many options as to where the greenhouse would actually sit. This piece of land required no prep and was already an established garden bed, which made the work lessened for prepping the soil for Fall planting. I'll take it!

2. Second, we selected our greenhouse plans. As Stuart often reminds me, he is not a builder. Nor does he really desire to be. That being said, he's still a fairly capable carpenter. We decided to (roughly) follow these plans as presented HERE. I thought about writing them all, retyping them exactly the way we redid them, and sharing the instructions that way. But frankly, we're not nearly as precise or organized as this lovely lady is. So instead, I'm going to point you straight there and show you the real instructions from someone who actually follows them.
We modified the plans to result in a 10 foot by 16 foot greenhouse.

3. After the site and greenhouse plans were selected, we had to save up for the materials. Like aforementioned, we weren't budgeting for a greenhouse this big or this expensive, so it took a bit of saving (thanks Dave Ramsey!) to save up for the lumber and the plastic sheeting. We did get there, eventually, and were able to run to the lumber store to stock up.
We Utilized:
– 4 concrete blocks
– 4 5/8″ x 10″ galvanized screws
– 2 2x4x10 boards
– 4 2x4x16 boards
– 16 2x4x8 boards
– 2 boxes of 1 1/4″ exterior screws
– 21 12′ sheets of greenhouse plastic paneling
– 4 8′ sheets of greenhouse plastic paneling
– 9 packages (5-count each) of Suntuf horizontal wood stripping
Stuart assembled the bulk of the greenhouse in the shop and then threw it in the back of ‘ol Bess to bring it up to the work site.

But before that, we had to sink these square cement block things. What are they called? I can't remember. What I do remember is that when we were designing the greenhouse, we both agreed that we'd have to find someway to anchor it into the ground against said winds. Otherwise, we'd have a very expensive and dangerous kite on our hands. And so, we (I use this word very vaguely) dug holes and sunk the concrete blocks. The blocks had been fitted with large bolts that ran through the center and into the horizontal frame of the greenhouse. Thus, the greenhouse was bolted to the ground via concrete blocks. Follow me?

After that, it's all sort of vague in my book. Stuart knew what he was doing, but I lost track at words like “tresses” and “rafters”. I helped as much as a super large pregnant woman could, but dare I say my contributions were much more of the “micro-managing” sort. The sort that are really helpful, and not annoying at all, to husbands who are slaving away on their wife's project in 105 degree heat.

After a week of on-and-off labor, the frame of the greenhouse was completed and level – not as easy as one would imagine. We are constantly reminded that “we're not experts in this” on the farm. Let's just add carpentry to that list. In the end, despite a few thrown objects and some mild cursing, the greenhouse was at least standing.

Sorry. This photo has nothing to do with anything. But just. Ahem. Never mind.

And then we had to put on the plastic sheeting.
Which – lo and behold – should not be left out in said 105 degree heat. Even though it's marketed as greenhouse plastic sheeting. Because said greenhouse plastic sheeting will actually, physically begin to melt in said heat. We saved it in time but were left with less than perfect ripples in the sheeting.
That made hanging it up fun.
And that was a sarcastic comment.

Here's a few tips for hanging greenhouse plastic sheeting:
1. 3″ wood screws are not necessary. Save yourself the misery, take a trip to town, and get the 1″ screws that you actually need. Or it will, quite literally, take you three times as long to screw the plastic sheeting to the frame of the greenhouse.
2. Have a drill that works. Because you'll be screwing in roughly 1,203,177 screws. And if you don't, it'll slip out of the screw, stripping the metal, hit your thumb a million times, and cause four letter words to all too easily slip out. Sorry. Truth.
3. Breakdown halfway through and go by your husband a new drill. For Heaven's sake. He's suffered enough.
4. DO NOT try and cut the plastic with fabric scissors or any sort of mechanical saw. I don't care what anyone says or how many YouTube videos you watch. It won't work. Instead, invest in a cheap pair of THESE BAD BOYS and move on with your life. (I just saved you at least 5 hours of frustrating experience. You can send thank you notes anytime.)
It took a few days to get all of the plastic sheeting hung and in place. Again, it wasn't easy and often involved balancing on the hood of golf carts and rigged ladders to get it into place.
Plus, this large ‘ol pregnant woman kept complaining about how hot it was and how hard it was for her to hold these 2 pound sheets of plastic above her head while husband screwed them in. Some people can be such babies…

Alas, the project did come to a close. And the mangled potatoes inside the greenhouse were thankful. Not only had they been mangled by feet and ladders for weeks, but they'd also been broken into by some very disobedient laying hens time after time after time. Poor, poor potatoes.

The last task to complete the greenhouse was not nearly as functional as it was for my personal, aesthetic desire. I mean, sure, the greenhouse needed a door but it didn't need a dooooooorr. But I wanted it to have one. And so we spent the better part of an entire day hunting through antique stores to find the perfect fit. Which, naturally, wasn't the perfect fit at all. In fact, in involved an entire extra day of manual labor to widen the door frame.
But unfortunately, once Mama gets her mind set, it's pretty hard to change it. And Mama wanted this luxurious, romantic door on her greenhouse.
I love my husband desperately. He didn't complain one time.
After the door frame was widened and multiple drops of sweat and blood were shed in the hanging process, the project was at last complete. The greenhouse stands gloriously strong and full of potential. It's rustic charm just beginning to peek out.

I still need to lay a brick entrance pad to avoid any dirt/mud issues come winter.
And naturally, I need a radical pot and topiary or something to pronounce the entrance in true European fashion.
And, of course, I had to at least plant a small garden on the side with perennial flowers and strawberries. Because as soon as my husband finished the project, naturally, he wanted to shovel wheelbarrows full of dirt at my command.
Did I mention I love him desperately?
All in all, I couldn't be more happy with the greenhouse. It's more than I expected and is a huge addition to the farm. With our currently 106 degree temperatures, it's also roughly 892 degrees inside. Which tells me it's working. And unless you're wrapped in ice packs, you don't enter. It's the no man zone right now.
So you want to know how much it costs, do you?
Fine. Let's air the dirty laundry.
Total Cost
Plastic Sheeting/Wood Stripping: $557.57
Screws: $16.94
Snips (for cutting plastic): $9.00
Lumber: $74.19
Concrete Blocks: $17.98
Screws for blocks: $10.28
Door: $60
Total Project Cost: $745.96
Not cheap – but doable. It was an investment. That's no secret. But I'm so thankful for it and will treasure it for years and years and years to come.
Happy growing!


I noticed that you left the cost of your husband’s new drill out of your total costs lol. I’m just kidding. I wanted to say that your greenhouse looks awesome, and you’re a very entertaining writer! Thanks for sharing!
The drill is multi-purpose 😉
Hi Shaye, I chose your page because I too am an Elliott.
Both my wife and I have recently become disabled. My wife, she injured herself when she was helping to move my father just prior to his passing. I became disabked due to an old Navy injury.
Therefore, we have been beating our heads against the wall, trying to come up with a hobby we both enjoy, adds beauty to our already beautiful marriage and requires less strenuous activity than our previous hobby of woodworking.
May I email you as I have questions about greenhouse growing as we are beginners but excited to learn. There is such beauty in nature between the variety if shapes and colors to the sweet fragrance of a Rose, a vine if lilacs or a bushy violet bloom.
We are hoping to get started soon so we can start building our greenhouse before the Michigan Winter begins settling in around late October.
Thank you for sharing your knowledge.
I can be reached by email at: [email protected] or by telephone, which number will be provided in any future email exchange.
God Bless!
Absolutely 🙂 !!
I LOVED your postings! Being a complete D.I.Y.er myself, nothing I have ever researched has gone as planned, on time, or on budget… but I have always been happy with the outcome. I looked up the panels and they are extremely expensive. Not sure where you got them or when.. but if possible can you let me know. I am wanting to do the same thing but estimating costs near $3000. because of the panels. I would appreciate it!
Hey Shaye, its 1:19 am and I’m watching and reading about building your greenhouse. Where did you find the plan and supply list? I’ll go by your list since you know exactly what you used and what worked out best. I’m in Conroe, Texas and have always wanted a greenhouse just couldn’t ever find one I could afford or liked. I like yours and can save that much. Thanks for being so candid. Your are transparent and that’s what people need these days. Thank you for sharing.
did you put in any ventilation for air control!!
I enjoyed your work, did you have to make it Air Tight,, and add roof vent ..
I totally agree ~ very entertaining and informative article ~ A GLORIOUS GREENHOUSE 🙂 congrats on accomplishing the build
My husband wants to build one. He has started his own handyman business to help us keep paying bills while he is only working 40 hrs a week at regular job. Please let us know the angle cuts for the roof.
Loved it!
Your greenhouse looks great. I do have one comment. I used to garden in the ground. My wife suggested grow beds. At first we used 1 foot tall grow beds that we sifted soil into so we wouldn’t have rocks. Rocks are a real problem where I live. After we had a good crop I said this is great but if I make them taller I won’t have to bend over to weed. I started making beds 2 feet tall and it is great. I used rough cut hemlock and larch that I cut from my own land but when it started to rot out I started to use corrugated metal roofing. There 27″ tall and won’t rot out. I might need to replace the corners eventually but no big deal. In a couple years I am going to have to build a greenhouse like this but I am going to use grow beds and I am going to have to use hinges in the side panels of the roof so I can dump the dirt in with the bucket of my tractor. I will also add that with the government printing money like it grows on trees I think the cost now will be ever so slightly more than it was in 2014.
i didnt see any signs of ventilation for air flow!!
I second that 🥰
Hi Shawna, I read your article about how to build a greenhouse. I would love to build one like yours. I’m on a budget and yours was the only one I found that I could afford. Is there any way you could tell me where you got your building supplies? Thank you for your article.
I agree with you completely. I built a similar one here at my place, Puget sound area. All I wanted to do was extend my growing seasons by 3 weeks on each end. So far its working great. I’m sure you will love yours for years to come
Ok, so the plastic sheeting wasn’t supposed to be all ripply like see-through corrugated metal? Cause I think it looks really cool even if it was a pain to do!
My husband hates after we’ve finished a project and we’re sitting there admiring our work and I go, “Hmm…” He puts his foot down and says no quite emphatically, but then a week later he’ll say, “You know that might not be too hard” and we’re off on another project!
Also, the views from your farm are something we can only dream of! Amazing!
The plastic sheeting IS supposed to have ripples but they’re supposed to be perfectly straight. Some of ours ended up slightly extra ripply from the sun 😉
So we are embarking on a project like this as I type, and we too live in that part of Washington where the summers are hot, the winters are cold, and the wind blows a bazillion miles an hour. What type of plastic sheeting (brand?) did you decide on? I’m looking at Home Depot and there are several types and I just don’t know which will be best.
Hello you really need to invest in something sturdy or the wind will shred the 6 mil plastic first or second year. I purchased Solexx and there are other good choices also.
Hey…. this is a great article! Just wondering what plastic sheeting you used?
Do you find any issues with mounting the sheeting horizontal? Seems like it would collect debris. And any vents?
Awesome! I’m soooooo Jealous! FYI – The concrete blocks are called footers and the “big screws” are called bolts. 🙂 Grow something fun for me!! 🙂
Glad someone knows what they’re talking about 😉 Thanks Stephanie!
Those are concrete piers blocks. You only have 4? You poured no concrete footings at all? Hopefully the weight of the entire structure keeps it in place, but then the double edge might be that it’ll sink if you have all that weight on just 4 blocks. Yikes. And it doesn’t appear the wood tied to them is pressure treated. Anything with direct contact to the moisture carrying soil should be as to not wick up moisture and rot.
Good luck. I think you should have spent a few dollars more. It does look pretty, though.
Are you concerned at all about all this investment in a rental property? (I think I remember that you’re renting it.) my experience with rentals is that they’re unstable; you never know when the price will go too high or the owners will decide to sell it to someone else. How do you handle that uncertainty while investing so much labor and money into the farm?
Emily, whenever I worry about the future of our farm, I remember that I’m not promised even the next breathe I take. All is of the Lord and ultimately, all will be His plan for us in the future. This brings me great peace!
What A Wonderful And Gracious Answer!
Amen, Bless her Lord for she is your humble servant
Amen
I really needed to hear this today. <3
AMEN!
My wife and I are in our mid 70’s and we have just bought a farm to retire on…. Hah! Too much to do on a farm to call it retired! But….. It brings us peace and a feel of being closer to God and to each other…. So; it’s worth it.
We are acquiring about 10 head of Brangus cattle and already have two donkeys and I am in the process of building a green house (a little smaller than yours) to start a test run on Aquaponics… We will start with 11050 Tilapia and a couple hundred heads of Iceberg lettuce… If that works out, its another greenhouse with strawberries and Asian Prawn. I am a retired Electronic Hardware Design Engineer and I have already started the design of a full automation system to take over the daily monitoring and adjustment duty. That way I will have more time to enjoy being on the land ^_^ We have about 30 acres in north central Florida and, except for the mosquitoes, it is great! (Need to finish planting the Lemon Grass to chase the mosquitoes)
Your greenhouse looks great (I’m a little jealous)
Enjoy it and God Bless you all.
Wow,,, Did I ever mess that up! I meant to type “150 Tilapia” darn keyboard, doest that all the time. ^_^
Amen
AMAZING!! Jealous over here! I live in Wyoming, so I understand the wind predicament, no hoop houses here, either. Saving this for my someday greenhouse!
Awesome greenhouse! I am definitely going to share this post with my husband. I love and really appreciate how you share the exact materials used and the costs. Thank you so much!
I am also wondering about your investments and labor put into this rental property…doesn’t that worry you?
We are very much at peace with being on the property for a long period of time. The Lord holds our future in His hands and that brings great comfort and peace with whatever that means for Beatha Fonn and our time here!
I’ve never known anyone who owns anything we all just rent from government can’t pay your land tax your gone just like you rented the place so what does it matter your not the real owner
Hi Jennifer, when I came onto your comment,about not owning your said property ,just renting it from the (good) 😕 government.. I live in Nova Scotia Canada and by damn I have said that to many myself ..because some do brag about what they own 😏and I most always say ” it’s yours as long as you pay your land tax but if you don’t pay them your property goes up for sale , so as I see it you rent and I rent ” …
Thanks Jennifer for those so true words!!
Shaye you and your hubby did a fantastic job building your greenhouse ,I’m 71 and a gardener now I want a greenhouse too,thanks for putting in the prices it gives me some idea what to plan for ..also I enjoyed your write up on your experience and yes I did lol through it…
I enjoyed your description of building the greenhouse very much. I like your comments about getting your husband to build it. I, too, an guilty of doing the same thing. “We” have built many things together and the next is supposed to be a greenhouse using a kit from Harbor Freight, which I bought and had our youngest son bring home for me. In his innocence, he agreed no knowing his father really opposed. It’s supposed to be 10’ x ‘12 with a double door and 4 roof vents. I believe it was 3 years ago that I bought it, and so far it still sits in its box (moved 3 times) and now in my husband’s metal building which is still needing one set of overhead doors. He is an extremely talented man who has more or less taught himself electrical and plumbing. He did go to school to polish his mechanical skills. He already had been working for a local garage throughout high school. But he never quite finishes things for us. That’s what I feared would happen with the greenhouse—maybe no roof! I planned to hire it built. My question for you is how many hours do you estimate you spent on it? What do you think would be a fair price to offer someone to build it?
Luv the greenhouse by the way!! And the door…fuget about it! 🙂
I love this greenhouse. We live in Eastern Washington and we made a greenhouse out of an old carport frame and greenhouse plastic. I was wondering what your plan for air flow in the summer/hot months is. We purchased a greenhouse fan, exhaust shutters, and thermostat off of amazon. It works great!
Awesome! I’ve been wanting to build my own greenhouse (of course…not by myself) for a while now. Thanks for taking the time to show how you did it and approximately how much it would cost.
Shaye,
Your greenhouse is lovely! My husband and I just built our own about three weeks ago and I’m very pleased with the result also. You however, have a slightly larger green house and built it for a fraction of the price. Jealous with a capital J!! I must say, great job! It looks beautiful and the door is just lovely. What are your plans for venting? I didn’t notice any vents or windows from the photos. Are you just leaving the door open in the summer? Are you planting flowers to attract bees?
P.S. I’ve been making your lip balm for years now and LOVE it! Share it with everyone.
P.S.S. I promise I’m not a stalker, but you are fantastic. I can’t remember now how I found your blog, but it’s in my “favorites” section. You’re my hero. Seriously. Awesome.
Bye!
Annie – happy to have you here!
Would it be possible to move this? We’d love to build one too but we’re renting and would like to take it with us when we move.
Eek! I don’t know! Possibly?!
Because of the use of footers (that you can just unbolt), I would say yes this is completely movable. But you may want to pre-assemble each side separately before assembling to whole thing – that way you can take down each side and load it onto a flatbed.
It’s beautiful. Very happy for you.
I, too, was wondering if it wouldn’t be too hot in there for the plants during the summer.
It’s beautiful. Very happy for you.
I, too, was wondering if it wouldn’t get too hot inside for the plants during the summer.
Where in the world did you find lumber for that cheap?????!!!!! I am building my chicken run/coop 20×5 (excessive I know, but functional for what I want). I bought 24 5/4x4x10 boards and it cost me $166.00!!!!! That’s JUST for the frame!! That doesn’t include the lumber I need to get to do the coops and I am in south WA near Tacoma. I can’t imagine such a huge price difference 🙁 I did not do very good research… obviously i paid for convenience since it’s only 5 minutes from my house!
The lumber for this project was purchased from Lowes.
In what State do you live, I ask because prices range from state to state.
Washington State.
aHA! I thought I recognized that terrain! Wonderful article, BTW. Entertaining and helpful. Saving this one. Thank you.
Annie, I live in Sequim wa. and the way I get my lumber chipper is to go to a local (small) saw mill and these guys will give you a better deal. look them up in the phone book or ask around. good luck.
I wish I had found this post much earlier. We bought a greenhouse kit for about $3000 from the GreenhouseCatalog.com and it was so flimsy that it collapsed in 3 days. They refused to replace it, or do anything to make it right. I should have just done it myself. Yours looks beautiful, and durable.
Thanks for empowering people to take it on, and do it themselves. I may just build our own replacement.
Xoxo
We have the same problem. We bought a kit this spring from Wayfare and it is such a bad, flimsy design. We live in Maryland, but on our property we also regularly get pretty strong winds, and it pushes the doors through, then all the roof panels start flying out. This is it’s first winter, and I am afraid it will not make it if we get any snowfall.
I love the concept of the greenhouse though, I had peppers still growing there 5 days ago with 28 degrees outside, until the wind did it’s thing again and now everything except frost resistant plants had frozen to death ;(.
I want to build a sturdy wooden frame that can take the winds. Will send your article to our builder friend and hope he can recreate it.
Really nice!! You have a right to squeal.
You just might think of getting an extractor fan that come on automatically at 80f I had to put one in as my wonderful greenhouse can go up to 120f + and plants really don’t grow much past 90f. I live in Canada and start a lot of seeds early. Unless you want a sauna in there. 🙂
Great idea, Katie!
Hi Katie,
I have a pit greenhouse that’s reaching 109F already. Where did you get your extractor fan! I need one!
Thank you for sharing your info.
Deanna
I LOVE THIS POST!!! You write so funny and entertaining – it’s hard not to laugh while reading it!!
And I LOVE this beautiful greenhouse!!!! My dream. Right there!! Thankfully my husband loves building stuff and especially for me (or so he says), so this will be his first project, once we found our farm land.
Really awesome post!!! And blog!! I cannot get enough of all this amazing information – which is exactly what we need for our future as homesteaders!!! Thank you so much!! 🙂
PS: Good luck with your belly!!!
Glad to have you here, Sandra!
I think the greenhouse is darling! I already have my husband thinking about how he will make it work for our farm. I have a couple questions though.
1. Does this need a vent or fan or both? If so what kind?
2. Does this need a heater for kale, spinach, etc. in the winter? We live in IN and it gets very cold here most winters. I thought I read that it gets cold where you are as well.
Also, thanks so much for a fun blog, inspiring ideas, and great recipes. I enjoy this blog so!!
Yes – it does, but I haven’t put one in yet. I’m looking into getting an extractor fan that will go through a vent in the side. You can set it to a certain temperature and when it gets above that, the fan turns on and pumps the hot air out. I will mostly likely use row cover in the winter over tender greens because yes, it does get very cold here too!
I just read your narrative on building a greenhouse … good sense of humor, excellent post, very informative. Can you tell me how you plan to vent the greenhouse?
A two-way fan that will moderate the temperature. Right now, as we’re heading into Fall, it’s yet to be planted so ventilation won’t be an issue until next Summer.
Thanks for sharing. I like your design of the greenhouse but I’d prefer to pour a concrete slab add drainage and plumbing, maybe even a mister system. Also add some type of sky light windows for venting purposes. Are you gonna add a greenhouse hearted for those winter days?
We’ll have to see how warm it keeps in the winter first. If need be, we will do a second row cover over the cold season crops that will be planted inside.
Winter Heating: You might try passive solar heating – but maybe this only works best in the southeast! 🙂 Fill barrels with water. Place them inside the greenhouse to absorb heat during the day, give off heat at night. Still, not only envious of your greenhouse, but that you both are apparently young enough to be able to bend over to pick up lumber and not strain your neck and shoulders by hammering. And are able to hold on to the power drill while it is running. 🙂
Shaye,
Love the greenhouse and your blog.
The door was a must. It totally makes the greenhouse.
I’m new to your blog-it’s lovely! Your greenhouse looks great! I especially love the old door-gives it some character. 🙂
My one thought it is that I didn’t notice any windows for any sort of cross breeze, maybe I missed it. My experience with greenhouses is that they need to be able to “breathe” a little sometimes-even if it’s just a simple flap near the roof line opposite the door. Otherwise, you may encounter some funky plant mold or fungus. I’ve had trouble with cucumbers in a badly ventilated greenhouse before. Although, if you only plan on using it in the cold months it shouldn’t be an issue. I suppose you’ll figure it out! How exciting to grow fresh greens in the winter! I’m looking forward to the updates!
Blessing to you and yours. -Anny
I totally LOVE your greenhouse and your writing style. I haven’t laughed out loud reading a blog in a long while. Looking forward to many more entertaining and educational posts from you! Now, if you’ll excuse me, I’m going to go back to reading your blog…I just found it and there’s so much to look at! Yay for me!
Nice!
Isn’t it lovely when you live in a windy area to have this protection?
We are in the same ‘boat’ or should I say on the same type of ‘ridge’ with LOTS of wind.
Utah is brutal for growing in the high mountains. But possible…with a greenhouse 🙂
We have a very similar design and it’s worked so well that I want to build a duplicate right
across from it 😉
I see you are in central Washington State. How bad are your winters. I live in NE Wisconsin and believe I would have to double almost everything for heat retention and snow load. Not to mention setting concrete piers instead of using porch block because of the 4+ feet depth of our frostline. It really is a very nice greenhouse.
That sounds like a heck of a winter!
Thank you so much for this post! We need a greenhouse and hope to have the funds to do it next year. Pinning this for later.
Hello, just found your blog and love it. My partner and I are beginning our homesteading adventure. I was wondering if you could please provide the dimensions of your greenhouse. Thanks!
It’s 10×16!
Awesome blog! So funny! Thank you for sharing everything as it helps so much! We sold our home in the burbs to move to the country. Now I want to build a greenhouse. My question is can you give me an idea of the plant layout in your greenhouse? I want to be able to plan out what I grow and don’t want to look back and think, “I should have made it bigger!”
Your greenhouse is sooooo lovely, you guys seem to have done a fantastic job.
I just want to let you know that I think that door has lead paint, and to just be SUPER careful about the paint chipping into your vegetable gardens soil. Lead is VERY easly taken up by plants.
I only say so cause it looks like this, and I would want someone to tell me,
https://www.facebook.com/LeadSafeAmerica/photos/a.506996152676327.112167.506989302677012/786842394691700/?type=1
Much love!
I enjoyed this more than words can say! Do you know if there is a way to make this a tiny bit smaller? We live in the city and our property isn’t very large. I have the perfect spot in my back yard but only have about 10 feet bu 20 feet. Thanks in advance! 🙂
Could you tell me where you purchased your plastic sheeting from, because I just checked out Menards and they are wanting almost $62 per sheet of MR 9″ Softlite 38″ x 12′ Corrugated Polycarbonate. That comes out to be $1300. Maybe I’m looking at the wrong stuff.
We got ours from Home Depot.
Lowes has it in Texas for $31 for 26″ x 12ft.
Shaye, you are one blessed woman! To have accomplished this greenhouse, and still have a loving hubby ! Wow ! You are so going to love being in that beautiful structure through all seasons, but only for short times in mid day summer heat ! Our Canadian Prairie winters are fresh enough to make Washington winter look like a beach holiday! I think this structure will work here, to extend our growing season a wee bit though ! Our high prairie winds are a concern, so I appreciate your experience with those footers. Did you only use 4 (corners), and have they worked well to anchor your structure? If they have, Kudoos to you ! How did you end up installing the ventilation fan, and vents ? How has the snowfall affected your greenhouse ? Does wet snow cling to those horizontal ridges on the glazing, or melt and slip right off!
Wishing you well !
That is all we used, though you may want to reinforce depending on size and strength of wind. I would ask someone in construction in your area, they will be more familiar with your needs.
I love this post. I have been following Ana since she was knock off wood and this is on my to do list!! I love your blog too so I was happy to see the intersection of two of my favorite blog ladies!!
Looks like this post was last year – how did this hold up over the winter and if you could change anything now, what would it be?
You, Dear One, are an EXCELLENT writer. I can hear your voice when I read (NOT an easy thing to do with words on a screen). And this post made me yearn to move back to Washington, where folks are friendly and the weather is ….WEATHER. I’m so happy for you (and yours). Near as I can tell, that greenhouse should pay for itself in about a year or so, yes? A terrific investment, indeed.
One last thing: your husband sounds like an angel sent from heaven. Thanks for that pic of his “tool belt”. You little vixen! It’s sweet that you appreciate this man, as I’m sure he does you. NEVER forget to appreciate. IT MATTERS!
Hugs and Cheers ~
Are you planning on heating it in the winter? I am an absolute novice at this kind of thing. Been a city kid my whole life and now I have 5 acres of wonderful flat ground with which to grow everything I can imagine. Thanks in advance for any type help as to what will grow in winter. I live in Michigan. Thank you!
We’re not planning on heating the greenhouse. Right now I don’t think it would be efficient, so I’ll just try to grow some things that don’t mind the cold.
Thank you for all the work you both went through to make this “easy to follow ” greenhouse plans accessible for us and along with the commentary ( absolutely funny- post process in sure ?) thank you!!!!!
Planning a greenhouse…hope to have it done by the end of December…I do want a heater//thermostat…what about growlights…do you plan to get any? What about a heater? I’m saving your info for my son who will be building mine…Thanks so much for sharing…it’s great to have people who are not insecure, and willing to share!
I live in the Upstate of South Carolina and I am considering a greenhouse as well.
One thing that caught my attention was you stated you built on a flat spot on the top of a hill. I’m curious, did you consider building into the hill?
The place where I want to build is a slope and I have thought cutting into the hill might be a good idea. After all, the earth is an excellent insulator.
Any thoughts/suggestions? Thanks!
I love this post! First one i am reading on your blog and it made me laugh and i was interested. I love how you mention those poor innocent husbands who love doing all the easy work of hammering and hauling while we have to do the hard work of managing them. I love my husband as well haha.
Great piece cant wait to check out the rest!
Your greenhouse is lovely! How has it held up over the past two winters?
Great!
Did you guys take the greenhouse with you when you moved?
On finding this article, I read it aloud to my wife of 30+ years and we had a good evening of laughs. She thoroughly understands your ‘micro-managing’ remark.
Greenhouses forever!
Can you share what you are growing and when it is planted? I want one badly but don’t have a good understanding of how to maximize it!
Great question – I don’t have a greenhouse at my new house yet but when I do, I will share what I’m doing and when!
Girl, that is a beast of a greenhouse. LOVE it. I need to build one like that.!!!
We bought out place about 2-1/2 yrs ago. My husband wanted to build a greenhouse, but not time with the upgrades and changes to the house, putting windows in the workshop vs. screen, getting a garden started, etc. Our garden the past 2 years was 40 x 80, this year he is enlarging it to 50 x 100. We didn’t kill ourselves last year, so he thought he see if we could do it this year. :). All through this he still wanted that greenhouse.
I found your plans about a year or so ago and he liked them. He talked about it, figured how he wanted to do it and talked about it some more.
We had two 100′ pine trees cut down and then milled to get our own lumber from them – enough lumber for the greenhouse and the chicken coop.
Well, in January he started on the greenhouse. He has the electricity and water ready to hook up and it will be completed. It is only 10 x 12, but we do live in Florida, so our winters aren’t bad. We thought it’d be big enough to start our seeds for the garden each year and to use in the winter to keep some veggies growing for us.
He made some changes to your design – not a barn shaped roof, siding part of the way up the walls and we painted the wood white (that makes it pop). I’d love to send you a photo. How can I do that digitally?
Thanks for all your inspiration.
Patsy, I would love to see a picture of your green house as mine is 14 x 14 with electricity and I plan on using vinyl siding as well. I’m trying to figure out if I need to seal the front and back walls on the ends where the polycarbonate panels end. Since they are rippled I’m not sure how to seal them because I want to heat and cool the greenhouse for year round use. Please email me at [email protected]. If this is not clear I can send you a picture or short video of what I’m talking about. Thanks in advance.
Awesome greenhouse, and thanks for so much information. We live in the South and the wind here is usually not a factor,… until its tornado season. The idea of attaching it to footers is great! We are planning on building a greenhouse and this is exactly what we are looking for. Thanks for such a wonderful, informative, and funny contribution!
Do you plant directly in the ground in the green house or did you put shelves or tables? Did you only use it for winter growing and starting things in the early spring? Did you need to add ventilation?
Great Tips! I hadn’t considered building one yet, because I didn’t think it would be that inexpensive.
I am going to show my husband your post. I have really wanted a greenhouse and you have motivated me to get started!
BTW I love your humor in the blog. If you ever need a guest writer my husband builds projects for our homestead too and I would love to collaborate.
I would use a clear flutted corrugated plastic (the kind that comes in 4×8 sheets and looks like plastic cardboard for about $210.00 per box of 10 sheets at home depot) you can support it inside with wood or metal (aluminum or steel square stock inside and aluminum flat stock is best for supporting outside though wood flat strips work, but require weatherproofing, while aluminum flat stock would not. You need to support this material every 2′ X 2′ both inside and out. You will find this plastic fluted corrugated material actually provides a much greater insulating feature over the single layer rippled clear plastic, which was used on the greenhouse shown. During the winter months, that extra insulating factor makes a significant difference. If you make your greenhouse at least 4′ longer than the actual planting area, then you can add several double stacked black 55 gallon plastic drums along the wall which will be facing the sun. Fill those drums with water/oil mixture and the sun will heat the barrels during the day and that solar heat will help keep the greenhouse warm throughout the night. And, this works even in Alaska but is improved with using a home made wood burning stove, or commercially available oil burning stove, built unit under a boiler or even a steel drum filled at least 3/4ths with with water/oil mixture. You want a little room for steam, but not too much. Attach steel water pipes running through multiple smaller steel drums also double stacked and filled with water/oil mix. Keep all the drums painted black and keep the fire going in the winter months. You will want the home made boiler in the center of that wall and don’t forget to vent your wood burning stove or commercially available oil stove at least 2 feet above the roof of your structure. A stove pipe cap is important too. You want a way to check your boiler drum regularly for any need to add water and it is best to have a good pressure guage and to have an automatic tripable boil off steem vent port. But if automatic is not possible (with a solor/wind power battery bank, it should be), then with welding gloves on open that steam valve at least once a week to vent the steam.
When I build my greenhouse I am making it into a hydroponic garden and using large tilapia tanks to have the fish help provide natural fertilization to the hydroponic system through the feeder pumps. That way my homestead will always have fresh meat and fruits and vegetables.
I worked in a greenhouse when I was younger.
I believe you mean twinwall polycarbonate. I did wonder why the author chose to use corrugated polycarb rather than twinwall, because as you say, the latter has far better insulation properties. Mind you, it’s also more expensive.
Awesome greenhouse! I’m using the same plans to build a 14ft by 14ft greenhouse out of my old deck which already had electricity. I have the top complete with polycarbonate sheets like you have and will be working on the vinyl siding for the lower portion and then making my own door. Did you enclose the ends of the front and back of the greenhouse to prevent air from getting in? Since the polycarbonate is rippled, my front and back at the very ends allow heat and air to escape. I’m trying to figure out how to seal the greenhouse so I can heat and cool it year round.
This is stunningly beautiful. In all it’s simplicity. I live in suburbia land because this is where God has placed us for the time being. We give thanks for it and anchor contentment into all that we do to our home. We have managed to build 1 of 3 garden boxes and at one point, I was begging people to leave with tomatoes in hand during their visits. I too am a foodie and find joy in connecting across the table with people as we feast over a delicious meal. Thank you for sharing your life as a homesteader, your passion to bless your family with a good meal and your never ending projects to enlarge your homestead. The encouragement it gives me to keep doing what I do as a homemaker blesses me more than you could possibly know.
Thank you for sharing and the cost estimates are helpful in my journey to build a greenhouse in hotter dry climate that has windy cold winter. I’m wondering if it will keep out squirrels ??
I’ve been looking for a greenhouse for my backyard. I’m not the best when it comes to growing flowers and stuff. My mom always had a huge garden that us kids had to work in everyday. Ive started canning again the last few years but it cost so much even buy straight from the farms to can. I thought I’d do better with a green house and have fresh veggies as much as possible.
then I wouldn’t have to can as much. I see everyone grows straight out of the ground. I’m a disabled vet and have a difficult time kneeling and have back problems. Michigan winters can be brutal ate times, do you think it would be ok to raise the garden so I don’t have to bend or kneel. Thank you
Carol Hill
Raised beds work great in a green house if you have a ground warming system like Rev. Cunningham, explained. I have all my garden set up in raised beds as I suffer from MS, but refuse to give in or give up what makes me happy. I have built in the heating system in the bottom of the beds and a watering system in the top with a soaker hose under mulch with row cover over the top. The heating system is set at 55 degrees Fahrenheit, which is normal ground temperature and it ensures that my water system does not freeze, therefore, my plants do not freeze.
All my beds were built with 2x12s, 8 ft long. then a 4 foot piece of 2×12 on the inside of each end and the middle. This allows for 4 x 4 foot beds. I painted all boards with at least 2 coats of exterior enamel paint to ensure their longevity. I have a 2 x 4 along the long side of the beds, because I am small, but can reach the 2 feet to the middle of the bed comfortably. I have 2 inches of sand in the bottom for drainage. In the green house, the bed is dug out 2 inches, that is where the heat pipes run, and the sand is used to cover. Last summer I started my sweet corn crop 6 weeks ahead of time and planted them in the outside bed when they were 6 inches tall. The outside ground temperature was then at 60 degrees. In 1 4 x 4 bed. I planted 32 corn stalks, I enriched the soil with 2 year old horse manure. I got a minimum of 2 ears per stalk, I had 6 stalks produce a secondary stalk, coming out at ground level and got 1 cob on those also. I had 7 stalks produce 3 cobs. That was a total of 85 cobs of corn from a 4 x 4 bed. I gave a lot away.
I live in western North Dakota with -40 degree days and serious winds on a daily basis. Normal winds here are 25-30 mph with the windy days of 60-70 mph. It is the wind that will cause the freezing in the winter. I use Twin wall polycarb. 2 ft tall to shield my beds from the wind.
It is all doable to meet your comfort level, and it is so satisfying. Good luck and have fun!
We just had a greenhouse built out of my old windows. It wasn’t cheap 🙁 .spent 1800 with labor and material.i am hoping it is strong enough to sustain boston winters. Super excited. Dont know where to start though. The floor is wooden, wondering how i will grow stuff.should i make beds or plant in containers? What happens when water seeps onto the wood floor? Any thoughts or start up ideas? It does look beautiful:)
I just came across this a few weeks ago. We are attempting at building our greenhouse with PVC pipe, but needed more stability because of high winds and snow. We were just starting to assemble it when one of the PVC rungs broke at the joint. It’s currently 40 degrees here. We are now obviously re-thinking how we are going to do this. We have already bought much of the materials needed and will need to use our greenhouse plastic that we already have. My question is and i hope it wasn’t already asked, I did scan through the comments but didn’t find anything related to my question. How did this style work for you? What would you change about it?
Hello Shaye! I discovered your blog and youtube videos this Summer and have really enjoyed them, and look forward to each new video you post! This greenhouse looks great, but what about your new greenhouse that you currently have? Did you guys design it yourselves, or did you find the plans somewhere? I know I’m commenting on an old post, so I hope you get this message! Thank you!
How do you heat and cool this green house? That’s our main issue.
Hi there! So happy to have found this tutorial. We live not too far from you and Moses lake and are considering building this exact same sized greenhouse. I noticed you built it a few years back and wanted to touch base to see how you are enjoying it? Does it function as you intended? Have you made any modifications since it was constructed? Thank you!
I’m interested too. I’d love to know if y’all added fans/vents. This is exactly what I’d like to build (read:have my husband build me). Please do let me know!
Any word on the longevity of this structure? I know you posted this like 6 years ago, and are probably no longer monitoring the comment section, but I like the design a lot, and wonder if you’ve found any limitations to the design that you’ve needed to remedy over the last 6 years.
Also, your opinion on whether it was sized acceptably for your purposes.
The original plans had sheet metal along the bottom. Is there a specific reason you used clear sheeting all of the way down? We are about to begin our greenhouse project and are debating between the two.
Thanks,
Amber
Started messing around with greenhouses three years ago built from laminated wood. see pligh.org made from scrap wood. Too costly from a standpoint of cutting 3/8 inch wooden strips which have to be run through a planer to get them smooth enough for gluing back together.
Now hoping to purchase a sawmill to cut strips directly from raw wood. This would be very cheap construction with laminated bits stapled on to make the arches.
This year we built from commercial 2x4s for something like your design. First version was 20 ft x 18 ft. lost 5,000 seedlings to a cold snap. Have also lost some seedlings to overheating.
The latest greenhouse design is 100 square ft to qualify as a shed for any urban property. It is 12.5 ft wide and 8 ft deep. Longer versions are just multiples of this 8 ft deep design. The sections can be transported.
Because of the overheating problem we have designed a 2 ft flat section on the top which is a ridge vent. This is covered with a little tent that swings open to form the vent. Heating will be with a rocket stove operating in a water bath. The warm water is pumped into pipe in the floor by a thermostat controlled pump.
Latest modification is using glass pot lids as lenses over holes in the flat top section under the little tent. Have to see how that works.
Just wanted to say that I just finished building this exact same greenhouse! I kept the original dimensions but did change the solid end into a door just like the other end. This allows me to open the doors for ventilation. It get HOT here in the summer so that excess heat has to be vented.
I dug post holes and used “J” bolts in cement to bolt my frame down. It’s very windy here in New Mexico for about 4 months of the year and I didn’t want my greenhouse to end up on the ranch down the road!
Also, a lesson learned…. I had some of that flimsy plastic left from last years hoop houses that I put up instead of the hard corrugated plastic. Was hoping to spread the costs out and not have to buy the corrugated plastic until the fall. That ended up being a huge waste of time. That flimsy plastic (and yes, it was 6 mil and UV protected) didn’t make 3 months. Those winds I mentioned above managed to shred it beyond hope. Ended up buying the corrugated plastic much sooner than planned and then had to put it on all the while making sure not to step on all the plants growing in side. Should have just done it right to start with!
2014 is the greenhouse still standing? For the size this, as pictured is no where near adequately braced for wind or snow. that is why I ask. thanks John
The picture looks like the blocks had no anchor bolts.How did the anchor bolts magically get into the concrete blocks? Can you give any details on where you got them or how you dug them and leveled them.
Great style in your writing!!!
Hi! Your greenhouse is lovely! Did you install any fans inside or a heater for winter? Do you water by hand or have a sprinkler type system inside?
Thanks!
Ashley
That’s a great greenhouse! I’d like to pay a friend of mine to build one for me. Can you tell me how many hours this one took to build, so I can estimate what I’ll need to pay him?
I live in a very windy area so do you think I need more than those cement blocks for an anchor, or will that do the trick?
My husband wants to build one. He has started his own handyman business to help us keep paying bills while he is only working 40 hrs a week at regular job. Please let us know the angle cuts for the roof.
Hi Shaye! Thanks for this. I’ve been wanting a greenhouse for 3 years now. I’m glad there are people out there who would willing to share their ideas and knowledge about greenhouse. I showed it to my husband and Mother in law and they would get the materials and build it for me. im so happy.
Entertaining read. I just spent a lot of time going through Ana’s plans you used to design/build yours, so I could devote more time to enjoying the portrayal of your variation! I spent 30 years in WA State, but now live in a WINDY area of Northern AZ, so I expect I’ll end up with a robust design such as this when we move forward. Thanks for the fun writeup, this person got use out of it!
I spent that much on my pressure canner! lol definitely a worthwhile investment, and it looks BEAUTIFUL!!! <3
Is there a reason you went horizontal with the corragted plastic rather than vertical?
Love your green house. It has inspired me to build one also. I am building a 12′ x 15′ greenhouse similar to yours with the gambrel roof. Have read lots of comments about installing the sheeting vertically instad of horizontally like yours (and Ana White’s). Have you had any issues with the closure strips rotting or leaks due to rain and snow? We live in southern Colorado and do get some snow each year along with the occasional rainstorm.
I grew up all my life in the greenhouse business, my dad ran a 5 acre greenhouse near Amarillo Tx, which we grew homegrown tomatoes and bedding plants. It was huge and very stressful. I later got the fever in my blood, and my father later sold off his greenhouse and we bought a small greenhouse and grew bedding plants. I later had my own business and focused on growing container plants for weddings. 4 years ago we moved and I had a contractor built a chapel greenhouse near Waco. It was dream come true, it cost us about $35,000 total, but we do rent it out for weddings. It is 17’ by 30’ and it is a vintage European greenhouse. 💒 The only problem is, it is great for events but it is not designed to grow plants.
Would you suggest a lean to or stand alone greenhouse? We have a little lumber left and about $1000 budget to build it ourselves, and we don’t have gas just electrical and propane.😉
I’m years late finding this post but thank you for sharing this! Since it’s been a while, can you share how this is holding up and did you ever put in a vent? If so, I’d really love to learn more about it. I’m presently prepping a space for a green house and really love this style.